Being in back-end development, we find the world of DevOps fascinating. There is so much to explore, and these latest trends help enrich the skill set to get along the transformative world.
Recently, we came across a task that required configuring the environment for a project. This encompassed seamlessly integrating Azure machines into a Kubernetes environment managed by Rancher. Additionally, we spearheaded the implementation of Continuous Integration/Continuous Deployment (CI/CD) pipelines for the project, streamlining its development lifecycle.
This hands-on experience not only expanded our expertise but also underscored the importance of synergy between development and operations in modern software engineering.
In our setup, we’ve leveraged Helm charts extensively to deploy our project. Our project boasts a Microservice-based architecture, boasting over 50 services, each requiring images built for every QA release. Among these services, there’s a pivotal core service shared across the board. Initially, we adopted a strategy where we built images solely for each component with the core service. However, this approach came with a notable drawback: our build time clocked in at around 7–8 hours for over 50 service images.
As a developer deeply immersed in the intricacies of our project’s functionality, we recognized the imperative need to trim down our build times. One solution that emerged was to streamline the process by constructing the core service image exclusively and then cascading it across the other services as a foundational image. This strategic adjustment held the promise of significantly slashing our build time, presenting a proactive step towards enhancing our development efficiency.
Here are the steps for building the images –
- Clone the service’s git repository (submodules-oriented in my case).
- Initializing migrations.
- Building core service individually.
- Passing core service as a build argument for all other services for building the images and pushing it to the docker repository.
- Cloning the helm chart repository.
- Updating the helm chart version with the built version of services.
Now, the steps are pretty clear for building the images
Now, let’s understand how we can translate these steps into Argo Workflows. Argo, an open-source workflow orchestration platform, empowers users to define, manage, and execute intricate workflows within Kubernetes environments. Within Argo, steps serve as discrete units of work, facilitating granular control and automation of tasks.
Installation:
· We have used the Bitnami chart for the Argo-workflows.
Reference: https://bitnami.com/stack/argo-workflows
· You can refer to the basic installation here: https://bitnami.com/stack/argo-workflows
Workflows in Argo consist of two major parts:
1. Main workflow: In our main workflow, we outline the step-by-step plan for our deployment process. This plan includes what each step will do, what information it needs (inputs), and what it will produce (outputs). We carefully design each step to work together smoothly, ensuring that our deployment runs without a hitch.

2. Step Workflow: In the step workflow, each step is encapsulated within a Docker container. These containers execute specific operations assigned to them and provide outputs that are then passed on to subsequent steps if required. This modular approach allows us to break down complex tasks into manageable units and ensures that each step operates independently, enhancing the overall flexibility and scalability of our workflow.
You can refer to workflow templates here: https://argo-workflows.readthedocs.io/en/latest/workflow-templates/
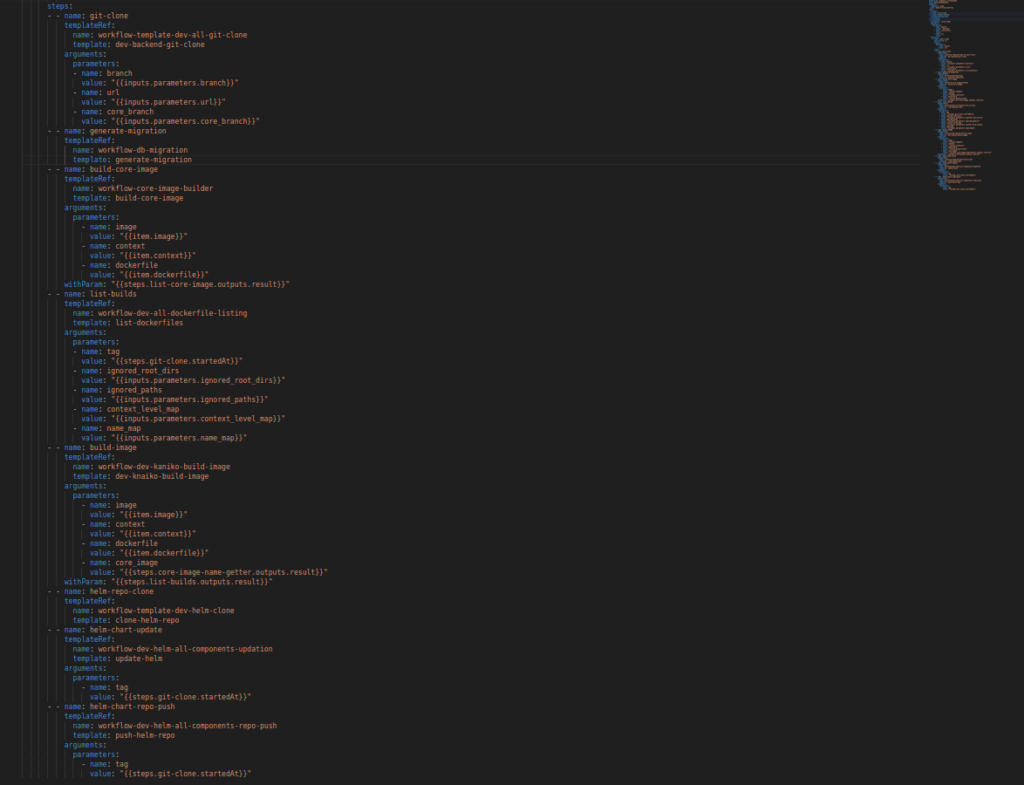
Let’s demonstrate both types of workflows (from the steps part)
In the above image, you can see we have defined all the steps listed in the bullet points.
Note: The workflow name you will create in the steps workflows should match the names you define in the main steps workflow in the above image.
To get any step’s output as the input, we have used a key withParam, a keyword, and then defined which step needs to take the output.
Reference: https://argo-workflows.readthedocs.io/en/latest/walk-through/loops/#withparam-example
Now, let’s talk about the steps of workflow:
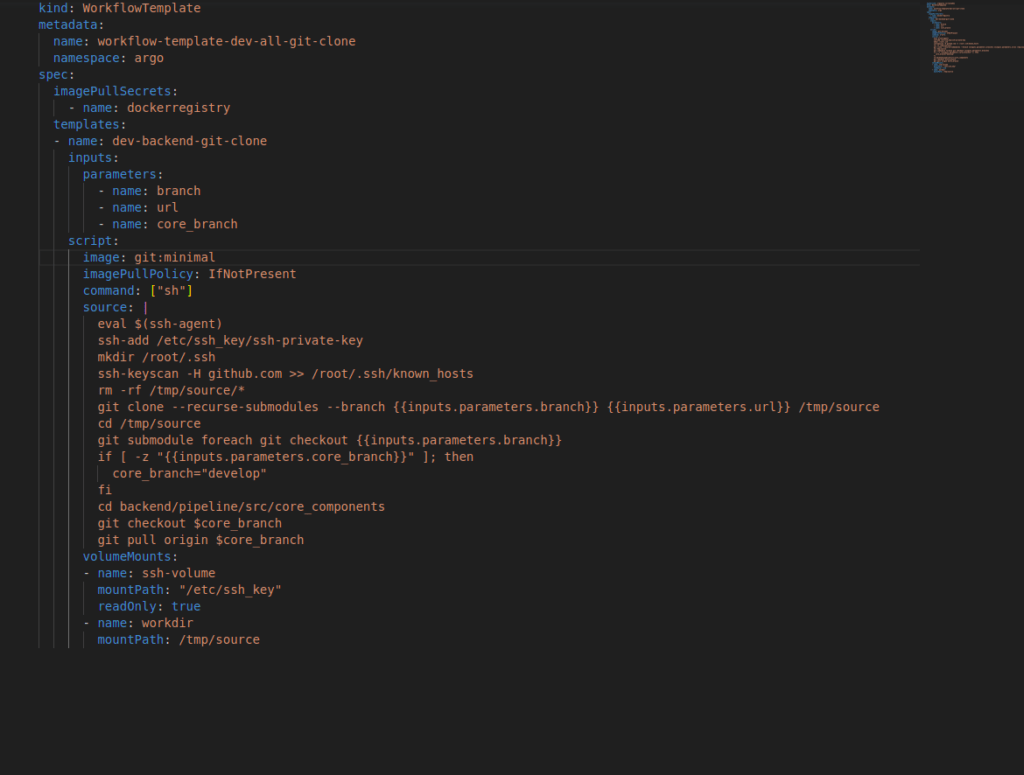
Steps workflow is nothing but a template consisting of what precisely the step is going to do.
Let’s see an example:
The above step template shows precisely what each step will do; in our case, we have git cloned the repository and git-checked it out to the respective branches.

Likewise, you can write templates for each step and perform some work in the step by writing some scripts in it.


