
In this series of blogs, I will be sharing my experience of using the following automated machine learning tools:
1) MLBox
2) GAMA
3) AutoGluon
After reading this post you will be able to understand and compare how the upcoming AutoML tools are able to perform in a tabular dataset.
The goal is to compare all the three tools based on the following:
-> Accuracy Achieved
-> Ease to use score
-> Time taken to complete the task
About Automated Machine Learning:
AutoML as the name suggests is a process that automates (almost) the complete pipeline of applying machine learning to real-world problems. Starting from data preprocessing to the deployable machine learning model. The main purpose of AutoML is to allow non-experts to make use of machine learning models to solve real-life problems without having any expertise in the machine learning field.
Automating the process of applying machine learning end-to-end additionally offers the advantages of producing simpler solutions, faster creation of those solutions, and models that often outperform hand-designed models
For comparison, I will be using the same dataset – Framingham Heart Study. The goal is to predict whether a person may suffer from Coronary heart disease(CHD). It has a considerable amount of missing values which will give you an idea of how these tools handle missing values.
In this blog, I am sharing my experience of implementing MLBox.
A brief introduction to MLBox:
According to the official document of MLBox,
MLBox is a powerful Automated Machine Learning python library. It provides the following features:
- Fast reading and distributed data preprocessing/cleaning/formatting.
- Highly robust feature selection and leak detection.
- Accurate hyper-parameter optimization in high-dimensional space.
- State-of-the-art predictive models for classification and regression (Deep Learning, Stacking, LightGBM, etc).
- Prediction with model interpretation.
Compatibilities:
- Operating systems: Linux, MacOS & Windows.
- Python versions: 3.5 – 3.7. & 64-bit version only (32-bit python is not supported yet).
Installation:
Assuming you already have pip, installing MLBox is pretty straightforward, just make sure you have setuptools and wheel installed, which is usually the case if pip is installed. If not, you can install both by running the following commands respectively:
| pip install setuptools pip install wheel |
After that you only need to run the following command:
| pip install mlbox |
Note: For MacOS users please go through the official document for installation
After installing MLBox, let us get into the fun part.
MLBox mainly has 3 sub-packages which need to be imported. These packages are: preprocessing, optimization and prediction. Each one of them is respectively aimed at reading and preprocessing data, testing or optimizing a wide range of learners and predicting the target on a test dataset. We also import pandas and train_test_split from sklearn to split the data.
| import mlbox from mlbox.preprocessing import * from mlbox.optimisation import * from mlbox.prediction import * import pandas as pd from sklearn.model_selection import train_test_split |
Okay now let’s get started.
1) Pre-Processing
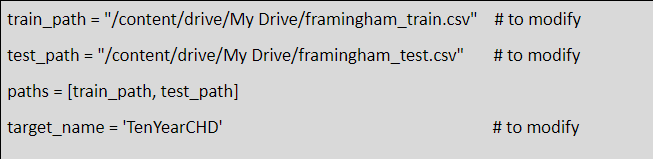
Steps 1: Get the path of the data.
Here we are taking the benefit of the preprocessing package that we imported earlier.
We have to provide the train and test path as a list and then provide the target variable which we want to predict.
Note:
One thing I notice is that we have to provide different paths for train and test data which is not the case of any other tools. This dataset provides a single CSV file that I had to split into train and test and save both parts as CSV path and then provide the path individually. It’s not a big deal but does increase a few lines of code. Also make sure your test data doesn’t have a target variable otherwise below code will show “no test data found.
Step 2: Create an object of the Reader class and split the data.
| data = Reader(sep=”,”).train_test_split(paths,target_name) |
Now then, this actually returns a dictionary type, that means the data type of “data” is dict with keys as [[‘train’, ‘test’, ‘target’]] and values as the data frame(the content of the CSV file) corresponding to the train, test, target.
After running this line, we get:

2) Removing the Drifting Variables.
The drifting concept is very vast and very important in machine learning and it requires another article to explain. I will try to brief you about it.
When we predict the dependent (target) variable, we assume that that train and test dataset are created through the same generative algorithm or process and it will not change over time. But in the real world, the data generation process can change and it can result in poor and degrading predictive performance in predictive models that assume a static relationship between input and output variables. So, removing those variables is crucial for better prediction. This is done automatically by MLBox just by running the following code:
Step 3: Create an object of class Drift_thresholder
| dft=Drift_thresholder() |
Step 4: Use the fit_transform method of the created object to remove the drift variables.
| data=dft.fit_transform(data) |
After running the above two lines, we get:

This feature of MLBox is really unique and it is not explicitly provided by any other tools.
3) Optimization
Here we will take benefit of the optimization package that we imported.
This is where all the magic happens. There are a lot of things to discuss in this section but I will just brief some of the important things. This hyperparameter optimization method in this library uses the hyperopt library which is very fast and you can almost optimize anything in this library from choosing the right missing value imputation method to the depth of an XGBOOST model.
Below is the list of four optimizations which is automatically done by MLBox:
Missing Values Encoder(NA Encoder):
numerical_strategy (when the column to be imputed is a continuous column eg- mean, median etc), categorical_strategy(when the column to be imputed is a categorical column e.g.- NaN values etc)
Categorical Values Encoder(CA Encoder):
strategy (method of encoding categorical variables e.g.- label_encoding, dummification, random_projection, entity_embedding)
Feature Selector(FS)
strategy (different methods for feature selection e.g. l1, variance, rf_feature_importance), threshold (the percentage of features to be discarded)
Estimator(est)
strategy (different algorithms that can be used as estimators e.g. – LightGBM, xgboost etc.), **params(parameters specific to the algorithm being used e.g. – max_depth, n_estimators etc.)
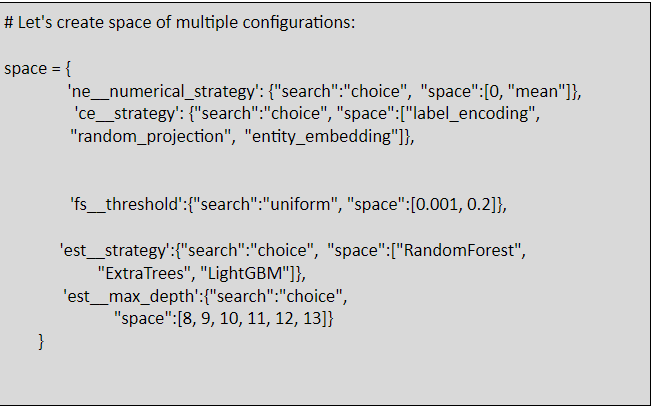
Good thing is, we can create our own search space and provide it as a parameter. But to test the default performance, I have first tested the default space provided by MLBox to see how that works in this data. Then I created my own search space and then tested it.
Step 5: Create an object of class Optimiser and evaluate the model
| # Setting up optimiser object opt = Optimiser(scoring=’accuracy’) warnings.filterwarnings(‘ignore’, category=DeprecationWarning) score1 = opt.evaluate(None, data) |
So, the scoring technique I used in all the three tools is ‘accuracy’. Also, the None parameter shows that we are using default search space provided by MLBox.
After running this code, we get:

Note: For complete result, refer to the code provided in the link
Optional:
Now if you want to create and use your own search space. Do the following.

It returns the best hyperparameters out of all the hyperparameters in the search space:

Note: For complete result, refer to the code provided in reference.
4) Prediction
Now we will use the prediction package that we imported.
Step 6: Create an object of Predict Class and predict the test data using the hyperparameters selected above.
| pred = Predictor() # For Default Configuration pred.fit_predict(None, data) |

After running this line, we get:
| # For Best Parameters from user defined search space pred.fit_predict(best, data) |
After running this line, we get:

This shows the top 10 important features which are used from prediction.
The above method saves the feature importance, drift variables coefficients and the final predictions into a separate folder named ‘save’.
And Voilà, we are done.
5) Conclusion on MLBox:
1) MLBox evolves just 6 steps to complete the whole AutoML pipeline.
2) The Avg Time taken to complete all the tasks is 10 sec.
3) Most important aspect, the accuracy:
- Using the default search space, it achieved accuracy = 83%
- Using user-defined search space, it achieved accuracy = 85%
4) Ease to use score:
I will give this library 7/10 for ease of use as it is a little complicated to understand in-depth and personally I did not like the idea of providing individual paths of train data and test data. That does involve human intervention which could have been avoided. The rest of the code is simple to understand and implement.
6) Pros and Cons of MLBox:
The pros are:
- Automatic task identification i.e. Classification or Regression
- Basic Pre-processing while reading the data
- Removal of Drifting variables
- Extremely fast and accurate hyper-parameter optimization.
- A wide variety of Feature Selection Methods.
- Minimal lines of code.
- Feature Engineering via Entity Embeddings
The cons are:
- It is still under active development and things may break or make at any point in time.
- No support for Unsupervised Learning.
- Did not detect Multiclass Classification when tested.
- Basic Feature Engineering. You still have to create your own features.
- Purely mathematical based feature selection method. This method may remove variables that make sense from the business perspective.
- Not truly an Automated Machine Learning Library.
- Manually providing train and test data paths.