

This blog is the third part of my series of blogs “A brief introduction to AutoML Tools”. In the previous blog, I covered up everything about GAMA, so I recommend you to go through that blog first.
For comparison, I will be using the same dataset – Framingham Heart Study. It has a considerable amount of missing values which will give you an idea of how these tools handle missing values. The goal is to compare all the three tools based on the following:
-> Accuracy Achieved
-> Ease to understand and implement score
-> Time taken to complete the task
In this blog, I will be sharing my experience of implementing AutoGluon.
1. Brief Intro to AutoGluon
According to the official website of AutoGluon,
AutoGluon enables easy-to-use and easy-to-extend AutoML with a focus on deep learning and real-world applications spanning image, text, or tabular data. Intended for both ML beginners and experts, AutoGluon enables you to:
- Quickly prototype deep learning solutions for your data with few lines of code.
- Leverage automatic hyperparameter tuning, model selection/architecture search, and data processing.
- Automatically utilize state-of-the-art deep learning techniques without expert knowledge.
- Easily improve existing bespoke models and data pipelines, or customize AutoGluon for your use-case.
AutoGluon automated machine learning tasks enabling you to easily achieve strong predictive performance in your applications. With just a few lines of code,
you can train and deploy high-accuracy deep learning models on tabular, image, and text data.
It’s a complete package, it automates everything from data-preprocessing to prediction.
Compatibilities
AutoGluon requires Python version 3.6 or 3.7. Linux is the only operating system fully supported for now (complete Mac OSX and Windows versions will be available soon).
Installation
Considering you already have pip, installing AutoGluon involves two lines of code:
| python3 -m pip install -U –pre “mxnet>=1.7.0b20200713, <2.0.0” -f https://sxjscience.github.io/KDD2020/ python3 -m pip install autogluon |
For installation in MacOS please go through the official document.
So now let’s get to the fun part.
2. Importing the packages
AutoGluon provides automation for the following task:
- Tabular Prediction (Classification and Regression)
- Image Classification
- Object Detection
- Text Prediction
And for each task, we need to import different packages.
First, we will have to import the autogluon library,
| import autogluon as ag |
For we are interested in Tabular Prediction, so we will import the following library:
| from autogluon import TabularPrediction as task |
Other libraries to be imported:
| from sklearn.model_selection import train_test_split |
3. Using AutoGluon to make predictions
Step 1: Getting the data and splitting it into train, test
Same as GAMA, we need to manually import the data and split it into train and test sets.
| train,test = train_test_split(data, test_size=0.3) |
Step 2: Create a AutoGluon Dataset Object and fit the training data
| train_data = task.Dataset() predictor = task.fit(train_data=train, label=’TenYearCHD’, eval_metric=”accuracy”) |
Note that here we need to specify the label which we want to predict as an argument.
After running this code, the information we get is:
- Number of rows and columns of the training data
- The task which is predicted by AutoGluon (Binary or Multiclass Classification in our case).
- Classes which are to be predicted. (1 or 0 in our case)
- List of different ML Algorithms that are being tested.
- Total Runtime
Note: One thing I like about AutoGluon is that, if the predicted task is wrong, then we can explicitly specify the task as ‘problem_type’ argument in fit(). You can specify one the following task: [‘binary’, ‘multiclass’, ‘regression’]
Also, make sure your test data does not contain the target variable/label.

Step 3: Prediction
In this step, AutoGluon predicts test data based on the hyper-parameters and the model chosen in the above step.
| y_pred = predictor.predict(test_data) |
It returns a NumPy array of all the predictions made by the model.
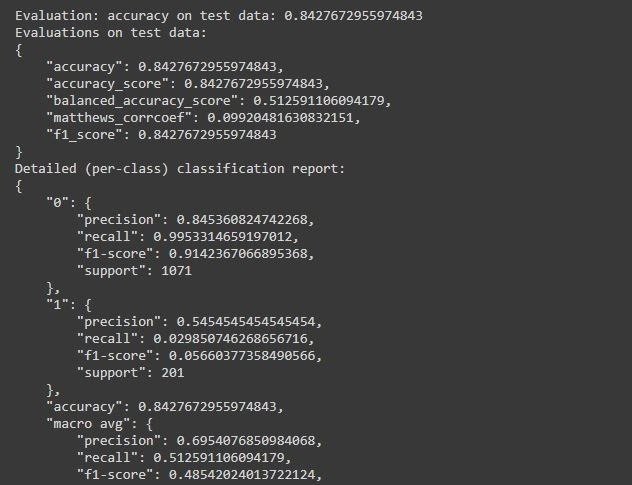
Step 4: Evaluation of the model
It’s time to check out how AutoGluon has predicted in test data with some scores.
| perf = predictor.evaluate_predictions(y_true=y_test, y_pred=y_pred, auxiliary_metrics=True) |
After running this code, the information we get is:
- Accuracy of the model
- Detailed per-class classification report
- Balanced Accuracy Score, F1, etc.
That’s all we have to do to make predictions using AutoGulon,
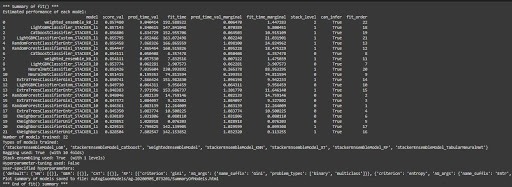
To get the detailed report of the performance of each model tested by AutoGulon,
| results = predictor.fit_summary() |
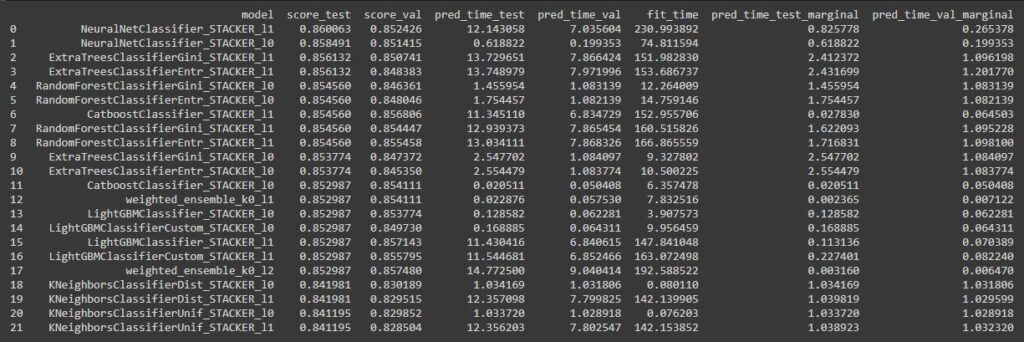
And to get the list of leaderboard,
| leaderboard = predictor.leaderboard(test_data) |
4. Conclusion of AutoGluon
a. AutoGluon also involves just 4 steps to complete the whole AutoML pipeline.
b. The average taken for data preprocessing, hyper-parameter selection and training is 7 mins and 30 sec.
I used Google Colab to run this tool so results vary according to which system you are using.
c. The accuracy achieved in default configuration is 84% to 85%.
d. Ease to understand and implement:
I will give this library a score of 9/10 for ease to understand and implement. This library is very easy to understand and implement and involves very less lines of code. The document provided has a detailed explanation of all the features available in this library. You can also find some blogs which also explains a lot about this library.
5. Pros and Cons of AutoGluon
The pros are
- Automatic task identification i.e. Binary, Multi Classification, or Regression.
- Minimal lines of code to implement complete Automated Machine Learning.
- Neural Network is also included while searching for the best model.
- We have the liberty to specify the task if the task which is predicted is wrong.
- Achieves accuracy similar to other famous tools.
- Includes deep learning automation tasks like Image Classification or Object Detection.
- Includes Automated Neural Architecture Search.
- Also supports auto model selection in PyTorch.
The cons are
- Bit slower as compared to other tools.
- Advanced topics like Custom AutoGluon, Neural Network Search are difficult to understand.


